Sunday, January 27, 2013

Triple Cooked French Fries (Chips)


So, forget for a moment that the the photo of above is not simply french fries, and is in fact Poutine with beef brisket, and focus on the simply the fries in the photo. Once you make these fries, you can use them for a myriad of applications, including fries supreme; with chili, sour cream, cheese, and green onions and such. Or simply enjoyed without any adulteration. Which in the case of these fries, might be advisable, because they really are that good. The technique is taken from high level master chef Heston Blumenthal and is simple, but perhaps more labour intensive than most people would expect from a way to make french fries. However, as he says about his fries, they have a wonderful glassy exterior, and a fluffy interior, and they almost instantly shatter and dissolve in your mouth, delivering wonderful potato flavour.

Recipe

Potatoes
Salt
Deep Frying Oil (Corn, Grapeseed, Sunflower, Safflower, Canola, Avocado)

This works best with dry type baking potatoes. In Canada, the best choices are White Potatoes, Russet, Yukon Gold. Do not use Redskin, Russian Blues, or any other highly starchy boiling potatoes.

1. Peel potatoes then cut into consistent thickness planks then cut planks into consistent sized batons. You're cutting french fries. Cut them the way you like your fries, but be consistent with the way you cut them to make it easier to cook them evenly. Place batons in a saucepan of cold water and bring to a boil, then reduce to a simmer and cook until the handle of a spoon or fork easily penetrates the fries with little effort.

2. Remove from heat and carefully remove the fries from the water and drain them in a sieve or a colander. The fries are extremely delicate at this point, be very careful not to break them. After draining them, line them on a tray lined with parchment paper and place them in the fridge for 30 minutes to cool. 

3. Heat a saucepan of oil to 150C (300F) and cook the cooled fries until lightly golden. This usually takes about 3 minutes. Cook in batches if necessary to avoid overcrowding oil. Be quick in putting in the fries, but be careful not to burn yourself. Remove fries and drain on a paper towel lined tray, then chill in the fridge again for 30 minutes on a clean tray. If you are serving these fries later, you can do up to step three ahead of time, and leave the last step until just before serving. 

4. Heat a saucepan of oil to 190C (375F) and cook the cooled fries from step 3 until golden. Again, cook in batches if necessary to avoid overcrowding the oil. Remove fries from oil, toss in a bowl with salt, serve.

Thursday, January 24, 2013

Gnocchi with Spinach Pesto and Yogurt Cheese

So, this stuff isn't really that big a deal to make, and gnocchi in general requires a "chill" attitude towards making, and eating. There is a great deal of ink spilled telling you how difficult, time consuming, and important gnocchi is, but it's actually easy, and also, delicious. I prefer my gnocchi slightly firmer, but nowhere near as firm as the stuff sold commercially, but I honestly don't really like stuff that dissolves in your mouth either. Also, for shock value, mostly because it doesn't really matter, I microwave my potatoes, and then use a box grater on them, so, anyone that says you have to bake them, or, you have to boil them then dry them out, and use a potato ricer, its not really true. Also, gnocchi is really about feel, and you should make them whatever length and size you really feel like, I vary them slightly when I make them, partially because I don't really care, and partially because I like it, when it comes to cooking them, I do group them by size though and cook them in size batches, just to ensure even cooking.

Also, gnocchi are really, really fast to make, and for some reason, lots of people find them impressive. Probably because they don't know how easy or fast they are to make. Also, with regards to sauce, you can eat them any way you want, I made them this way because I had some spinach I wanted to use up, and I'm allergic to nuts, so I don't eat pesto most of the time. However, gnocchi are good with tomato or cream based sauces, butter and herbs, butter and cheese, and simply even olive oil and salt and pepper, or honestly, without anything at all. Honestly, you could even use them in a stew, or a soup, or a curry, they'd be equally as good.

Also, Pesto and Yogurt Cheese, two things everyone should make, are included below. And pesto, like gnocchi is a touch and feel thing, you can make it to taste and some people like to add enough oil that it splits out, it's really about what you like. Yogurt cheese is so simple and with such a big payoff its ridiculous, it's like cream cheese, but, if you use fat free Greek yogurt, it's basically fat free cream cheese that tastes better than cream cheese! You can use other yogurt, and even fruit yogurt for the process, its all good. The process is simple, and the less whey in the yogurt, the quicker the process.


Gnocchi

Serves 2

1 Potato (Approx 240g)
4 Heaping Spoonfuls All Purpose Flour (Approx 40g, some for kneading)
1 Large Egg 65g (Beaten)
Salt, Pepper

1. Wash and clean potato, remove eyes or black spots. Pierce all over then microwave on high, 3 minutes in a 1200W microwave. Flip potato over in microwave, and repeat again on high for 3 minutes.

2. Wear gloves or allow potato to cool for about 7 minutes, cut in half and grate flesh into a bowl, discard peel. I usually eat the peel with salt and pepper, it's delicious, and contains a great deal of vitamin C.

3. Lightly toss potato flesh in the bowl with a spoon to allow them to cool slightly then add beaten egg and salt and pepper, stir to combine. Then add flour, stir until dough forms into a large ball then turn out onto floured board.

4. Gently knead on floured board until dough stops being tacky. This usually takes only a few minutes, gnocchi dough requires nowhere near the same amount of kneading as bread dough.

5. Form dough into long finger thickness ropes, then cut ropes into knuckle sized pieces. If you have a gnocchi board, use it to create the traditional ridges. They don't REALLY do much for the gnocchi, but they're very appealing to the eye. See below for a pretty chill video on using a gnocchi board.

6. Boil pieces in lightly salted boiling water, gnocchi are cooked, and ready to be scooped out when they've floated for about 30 seconds. Drain gnocchi fairly well, coat lightly with olive oil and salt and pepper for serving. Keep warm until pesto or sauce is ready then combine and serve.


Pesto

Small Batch

1 Cup Baby Spinach (Approx, Cleaned)
1/4 Cup Unfiltered Olive Oil
1 Clove Raw Garlic
1 Tbsp Lemon Juice
1/2 Tbsp Dried Basil
1 Tsp each Salt and Pepper

1. Combine all ingredients in a food processor and combine well. If using as a sauce for gnocchi, warm slightly then combine with warm gnocchi.


Yogurt Cheese

1 500g Container of Greek Yogurt
This yogurt is already thick, so the process is really quick, thinner yogurt takes longer to drain, and will yield less yogurt cheese.

1. Line a fine mesh sieve with paper towel and place it into a bowl large enough that the sieve sits without falling out, and with at least 10cm of clearance from the bottom of the bowl.

2. Pour the yogurt into the paper towel lined sieve, cover with more paper towel or fold sides of paper towel back over the yogurt.

3. Refrigerate for 24 hours or until about as firm as cream cheese. Discard liquid or use to flavour sauces, stews, soups, or curries. It's a slightly acquired taste though and is essentially whey protein, which some people drink to build muscle. Just taste it before using it in a sauce.


Saturday, December 8, 2012

Mushroom Galette

So, rather than being a mushroom tart per se, this is simply a mushroom, cooked like a potato galette, except with far less oil. It really helps to use a non-stick pan over medium low heat to cook the galette. And to cook it really only requires a bit of patience. Finished with a bit of salt, pepper, unfiltered olive oil, and oregano, the dish is beautiful simplicity. I truly believe this would be even better with a drizzle of truffle oil.

For mushroom lovers.

Saturday, October 27, 2012

Beef and Pineapple

I really wish I had green onions for this...
So, I don't know. I like beef, I like pineapple. So does my girl. So, this was an easy sell. And, polls say, she thought it was delicious. I marinated the beef for quite a few days for this, I'm not really if it was entirely necessary. I used stewing beef and marinated it in chunks for the majority, and for the last few hours I sliced the beef thinly, then returned it to the marinade.

Before cooking the beef, I cooked the peppers and onions, then removed them from the pan, then coated the beef in rice flour, then cooked it in hot oil. The combined everything in the sauce, and added pineapple at the end. Overall, pretty good, although, I really wish I had a wok burner and a giant wok so that I could really drive the heat through my stir-frys with maximum performance and extreme prejudice.

Recipe to follow


Tuesday, October 23, 2012

Salisbury Steak, Mashed Potatoes, and Rapini


So, this meal came out of happening to get ground veal for $2.99/lb one day and not wanting to do typical ground meat options. The gravy in this dish really makes it, and is extremely rich and full of intense mushroom flavour. I think I put this whole meal together for $13 and got about 8-10 servings from it, not bad really.

Recipe to follow shortly.

Beet and Beef Borscht


So, this is pretty straight forward. I accidentally made this without the luxury of Dillweed, so I substituted with Dill Pickle Juice. Turned out, okay, but not one hundred percent ideal. Having 14% MF Sour Cream and Sauerkraut on top doesn't hurt though.

Ingredients

1Kg Stewing Beef
2 Large Peeled and Diced Beetroot
350ml Dill Pickle Juice
TT Granulated Garlic, Salt, Pepper
Sauerkraut and Sour Cream to Serve
Water to cover

Directions

1. Using a pressure cooker, sear beef until reasonable browned then add beetroot, and cover with water, cook for 25 minutes under pressure.

2. Remove beef chunks and beetroot from pressure cooker and boil down remaining liquid until reduced by half. Add dill pickle juice. Season beef and beetroot generously, combine with reduced liquid from pressure cooker.

3. Serve hot. Add dollop of sour cream and sauerkraut on top. Season to taste.

Sunday, September 9, 2012

Braised Beef with Herb Risotto


So, I picture being able to break apart a braised piece of inside round with a fork like George Calombaris does in the video below. But I feel as though, no matter how long I braise inside round, it will never do that, and the reason being, is it's too solid a piece of meat with a total lack of marbling or connective tissue. The longer it braises, the dryer its mouthfeel is, no matter how much liquid its immersed in. It should be noted, the cut of meat in the video below is beef cheek which is supposedly tough and lean, but perhaps the increased presence of connective tissue is what makes the difference.


Oh well. In spite of the minor shortcomings in terms of texture, the taste and overall eating experience was still quite high for this dish. Also no one really hates risotto. So, after watching a few videos, perhaps I haven't braised the beef long enough, I just saw a video that recommended braising beef cheeks for 6 hours at 160 degrees Celsius. The stuff that I cooked, at most, got about 2 hours. So, perhaps there's still hope for inside round after all.


Recipe to follow


Wednesday, September 5, 2012

Custard Style Scrambled Eggs and Double Cooked Potatoes with Prosciutto


So, this is more of a technique than an outright recipe and came about as a result of attempting to get breakfast ingredients on an early sunday morning from my italian/korean butcher-grocer. Failing to strip bacon from their clutches, and leaving only with a chunk of superior house-made prosciutto I was relegated to the breakfast depicted below.


Although those potatoes look as though they were deep-fried, I assure you, they were not at all. The technique for the potatoes is both simple and very rewarding. They were boiled till tender, drained, roughed up a bit, cooled in the fridge, then baked in the oven. The prosciutto was added during the last few minutes in the oven to render some of the fat out and improve the texture. The eggs were cooked slowly over a double boiler over low heat until gently curdled and then seasoned and finished with a few drips of brown butter and balsamic vinegar. This technique creates very creamy eggs without the use of butter or cream.

Unfortunately my girl did not enjoy the eggs as they were too creamy for her liking. She associates creamy eggs with rawness so I ended up eating her portion, and quite happily. The potatoes however, went over very well. Light and fluffy in the centre and glassy and crisp on the outside with a mild combination of garlic and marjoram.

Wednesday, July 11, 2012

Pressure Cooker Braised Beef with Crispy Garlic and Tomato, Cucumber, Caper Salad

So, there's an all-you-can-eat Sushi restaurant that my girl and I really like and one of the things on their menu is a very simple dish, labelled simply "cube steak with garlic" and since my girl likes ordering it so much, she asked me to make it for her, so that's pretty much what happened here. I would have liked to get the garlic crispier than I did, but that may have involved shallow frying, or at the very least, using a new pan that I wasn't using to sear the beef. It suddenly occurred to me that broiling lightly oiled sliced garlic might work too.
Those little pieces of garlic look almost like flower petals...

Ingredients

Stewing Beef
1 Head of Garlic (Peeled and Sliced)
1/2 Cup Worcestershire Sauce
1/4 Cup Yellow Prepared Mustard
3 Bay Leaves
Olive Oil (For Searing The Meat)
Salt, Pepper

2 Cucumbers (Sliced)
20 Cocktail Tomatoes (Halved)
1/2 Large Onion (Sliced)
4 Tbsp Capers (With Liquid)
1/2 Cup White Vinegar
1/4 Cup Olive Oil
2 Tbsp Granulated Garlic and Dried Basil
Salt, Pepper

Directions

Salad

1. Combine the vegetables in a large bowl, pour oil and vinegar over, add capers, garlic, and basil, stir well to combine. Season to taste.

Beef

1. Sear beef in hot olive oil and reserve. Deglaze between batches with water, reserve lightly reduced liquid and pour over beef.
2. Fry sliced garlic in hot olive oil and reserve garlic and oil.
3. Place reserved beef pan deglaze reduction liquid in pressure cooker and combine with mustard, Worcestershire, bay leaves, stir to combine, then add beef. Pressure cook for 30 minutes, or braise at 300F in oven until tender.
4. Remove beef when tender and reduce braising liquid, skim impurities and strain.
5. To serve spoon reduced braising liquid over beef and top with sliced garlic and a small drizzle of oil used to fry garlic. Season to taste.

Monday, June 25, 2012

Meat Plate

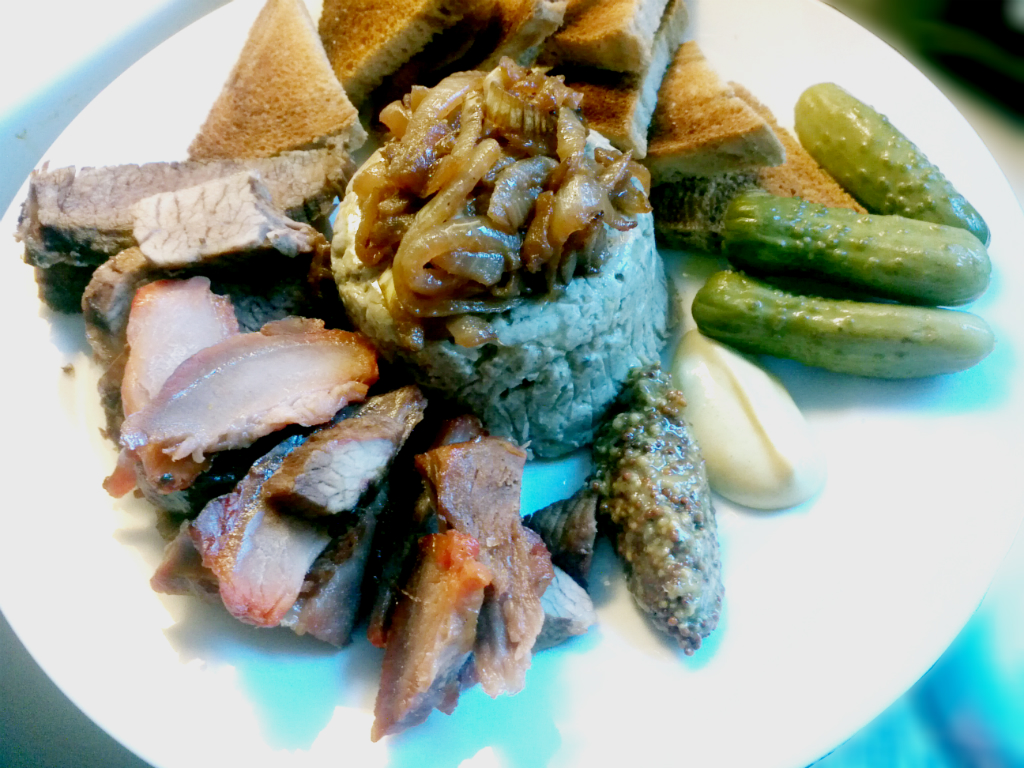
So, this is what I decided to make last night. Mostly because I didn't really have a lot in the fridge. Turkey and Mushroom Pate with caramelized onion, more homemade corned beef, Char Siu from T&T @ 16&Woodbine, Bick's Picks, Marble Rye Toast points, and Dijon and Whole Grain mustards. This dinner didn't really go over that well, and I can't say I'm surprised.

Meat Plate.

Sunday, June 24, 2012

Corned Beef Sandwich

Easily one of my all time favourite things.
So, corned beef. An amazingly delicious thing. I've wanted to make thing for a very long time, and one day, I finally made some. Or more aptly, I finally started making some. The reason I say started is because it actually takes about 21 days to make. Now, after having made this I'd probably most definitely do at least one thing differently. After the pickling process, I steamed the corned beef in a pressure cooker for 90 minutes. The next time I make this, I'm going to steam it in a large stock pot and try to keep the steam as close to 71C as possible and cook the meat until tender.

Even though I made this in a pressure cooker, and it was slightly less juicy that I would like, the flavour and the texture was still absolutely amazing. The fat on the meat was delicious and melt in your mouth tender. I normally like my corned beef sandwiches to be pretty lean, but a mix of a small amount of the fattier pieces with mostly leaner pieces proved to make a delicious combination of flavour and texture. Both my girl and I, and everyone else that ended up tasting it told me how amazingly good it was, and personally, I'd be hard pressed to go to a deli again for a Corned Beef sandwich. I didn't have pickling spice on hand when I made this, so I put a few things together after reading a bit about pickling spice. I'm sure that if you used a pickling spice mix it would still be just as good. Also, since I made this three weeks ago, and didn't take any notes, I'm slightly hazy on the spices I used and proportion of each.

Ingredients


1 Beef Brisket
Cold Filtered Water (Enough to cover the meat)
Salt (70g (1/4 Cup) Per Litre of Water)
Pickling Spices (140g (1/2 Cup) Per Litre of Water) Cloves, Garlic Powder, Black Pepper, Cardamom, Bay Leaf, All Spice Berries, Cinnamon, Mustard Seeds, Coriander, Salt.

Directions


1. In a large clean bowl, add meat, cover with measured amount of clean filtered cold water. Add measured amounts of salt and pickling spices, use a dinner plate or something heavy to keep the meat weighed down. Cover with plastic wrap and refrigerate for 21 days.

2. Remove meat from brine and discard brine. Steam meat in a pressure cooker for 90 minutes. I will update this recipe again after I've tried the new method, but for those adventurous, here's what I'm going to do. Steam the meat at 71 degrees Celsius in a large stock pot using a tall round rack to keep the meat elevated and out of the water until tender.

3. Serve with standard yellow mustard on marble rye or pretty much anything you want. I ate it with some mustard and no bread and it was still delicious.

Wednesday, June 13, 2012

Haddock with Roasted Tomatoes, Asparagus, and Spicy Cabbage

So, I actually should give my mother credit for showing me that baked haddock could be quite good. Quite good indeed. And his really is good, I'm not sure that it would work well with any fish, but with slightly thicker filets, it works really well, and I actually prefer this to cooking En papillote. The general method is quite simple, brush the fish with olive oil, salt, pepper, and herbs on the presentation side, bake on a lined sheet at 400F for about 3-4 minutes, then broil from the top side at 400F for about 3-4 minutes. Other than that, there's not much too this meal. But it's highly, highly, rewarding and delicious. This recipe is more about technique though, than ingredients, so I'm not really including a full ingredients list.

Really delicious.
Directions

1. Portion fillets into squarish pieces for serving, place pieces on a parchment lined baking sheet. Brush with olive oil, season lightly with salt and pepper and dried herbs. Bake in the middle rack of a pre-heated 400F oven for 4 minutes, then broil for 4 minutes at 400F. Gently probe the fish with fingertip or spoon to check for doneness. Remove from oven and allow to sit at room temperature.

2. Lay tomatoes on a parchment lined baking sheet, drizzle with olive oil, and in a pre-heated 400F oven broil tomatoes until blistered.

3. Blanch asparagus in salted boiling water for 2 minutes or to desired doneness then remove pieces to cold water. Dry and season before serving.

4. Cut cabbage into large bite size slices, combine with sliced and de-seeded habanero pepper, fry in a dry saucier over medium high heat for 1 minute, then add a small amount of water to bottom of pan, stir and cover, reduce heat to medium low, cook for 6 minutes, add heaping tbsp red pepper paste, cover, cook for 3 additional minutes. Season before serving.


Tuesday, June 12, 2012

Pulled Pork Sandwich on a Buttermilk Biscuit with Fresh Coleslaw and Crackling

So, technically, these were slightly more for a BBQ Birthday party for a friend of mine than they were for my girl. However, she did to eat some of them (kind of as my guinea pig though) and in doing so, helped me to determine the ideal way to serve them. I had never worked with crackling before, and in this kind of sandwich, it's best to leave it at room temperature, and to break it into small pieces, and to remove any pieces that feel too hard to eat. These are slightly labour intensive to make as it requires making buttermilk biscuits, fresh mayonnaise then making coleslaw using a mandoline, removing the skin from a pork shoulder, blanching it then roasting it and basting it in its own fat, searing the rest of the shoulder evenly on all sides then braising it, then making a barbecue sauce from a few different reductions and caramelized onions, but the results are pretty good.

Kind of delicious.

Ingredients

Buttermilk Biscuits
2 Cups Bread Flour
1 Cup Buttermilk (Chilled)
1/3 Cup Butter (Chilled)
1 Tsp Salt
2 Tsp Baking Soda
1 Tsp Baking Powder

Shoulder
1x Pork Shoulder
Dry Rub (Smoked Paprika, Granulated Garlic, Salt, White Pepper)
Braising Liquid (Water, Worcestershire Sauce, Chicken Stock)

Crackling
Skin From Pork Shoulder
Salt

Mayonnaise
2 Egg Yolks
30ml Ea Dijon Mustard, Mirin, Lemon Juice
200ml Grapeseed Oil
1/2 Tbsp Ea Granulated Garlic, Dried Fine Herbs
Salt, White Pepper to Taste

Coleslaw
Chilled Mayonnaise
1/2 Head of Cabbage
2 Medium Sized Carrots
Mirin and Celery Salt to Taste
Salt and Pepper to Taste

Sauce
2x Medium Onions (Finely Sliced)
Braising Liquid Reduction
100ml Apple Butter
30ml Pitcairn Honey


Thursday, June 7, 2012

Beef Stew with Roasted Zucchini

So, knowing that I would be making something similar in my upcoming cooking class, and knowing that my girl would not actually have the opportunity to taste it, as I'm taking that particular stew to a party, I decided to make this for her with the stewing beef that she told me to buy. It was also made from a vegetable pack that was intended for grilling which I said, "f'you grillgoals!" to and cooked them in a bit of olive oil in a skillet instead. I think the key to the success of this dish is making a really good sauce that will become the body of the dish and was in fact so good that my girl drank it from her bowl, a rare occurrence. Also to cook the meat and the vegetables separately and in the most ideal manner for each and then combine everything at the end. In general, I really like cooking vegetables covered over medium low heat in a skillet, then uncover and cook over medium heat with a bit of olive oil, then remove from heat and season to taste. I also used a pressure cooker to make this recipe, I think it went a long way towards infusing more flavour into the sauce as well as tenderizing the meat tremendously.

A huge success with my girl.

Ingredients

Sauce
1000ml Organic Chicken Stock
90ml Tomato Paste
1/2 Medium Red Onion (Large Slices)
1 Medium Sized Carrot (Peeled, Large Slice)
1/2 Rib Celery (Large Slices)
2 Cloves Garlic (Peeled and Lightly Crushed)
1 Tbsp Bread Flour
Salt, Pepper
Dried Oregano
Olive Oil

Stew
1.5kg Sirloin Stewing Beef
1/2 Red Onion (Fine Chopped)
1 Medium Carrot (Peeled, Fine Dice)
1/2 Rib Celery (Fine Dice)
6 Stems Asparagus (Chopped 1.5cm) 
1 Yellow Pepper (Medium Diced)
8 Cherry Tomatoes
Mushrooms (Medium Thickness Slices)
2 Cloves Garlic (Pureed)
Salt, Pepper
Dried Oregano
Olive Oil

Zucchini
800g Zucchini
90ml Tomato Paste
Olive Oil
Salt, Pepper

Directions

1. To make the sauce, over medium heat, add a generous amount of olive oil to a skillet, add vegetables cook for a few minutes, add tomato paste, cook for a few minutes more, add flour, stir until well combined, add stock, reduce heat to medium low, whisk until smooth, continue whisking and increase heat to medium high, whisk until slightly thickened. Strain and reserve liquid, discard vegetables.

2. Pat dry stewing beef, salt generously. Heat skillet on medium high heat with olive oil. Sear meat in single layer batches. Sear carefully on all sides. Deglaze with water between batches, reduce and add to reserved sauce. Discard deglazing liquid if it begins to taste burnt or bitter. Place seared beef in pressure cooker and cook under pressure for 25 minutes, allow to cool, remove lid, carefully remove beef using tongs, reduce cooking liquid by half and reserve.

3. Cook vegetables for stew in clean dry skillet over medium low heat, covered until softened. Remove lid, increase heat to evaporate some liquid, add a bit of olive oil, cook until slightly browned, remove from heat, season with salt, pepper, and dried oregano.

4. Combine beef, vegetables, and reduced cooking liquid, season to taste.

5. Rub zucchini strips with remaining tomato paste, sprinkle salt, pepper, and olive oil. Bake at 400F until softened, then broil at 400F until slightly browned.

Tuesday, May 29, 2012

Lemon and Thyme Chicken Breast with Brussels Sprouts, Mushrooms, and Avocado


So, normally my girl and I don't have chicken as she's allergic to the additives in commodity chicken as such, chicken has become a rare treat and we only have it when I buy a whole free run or organic chicken. Which is not that often. However, on the suggestion made by a mutual acquaintance (*cough, my mom, cough*) I bought some Kosher chicken breasts under the premise that they would be kosher for my girl to eat. She ate this last night, and will be eating this all week, so here's hoping that she doesn't breakout and have any major histamine response.

Ingredients


Chicken
8 Half Chicken Breasts (Butterflied)
1 Chopped Onion
3 Lemons (Juice and Zest)
1 Tablespoon Granulated Garlic
1 Tablespoon Thyme
Organic Chicken Stock (Enough To Cover)
Olive Oil

Sauce
2 Lemons (Juice and Zest)
250ml Organic Chicken Stock
4 Cloves of garlic (Peeled and Sliced)
Pan Juices from Chicken
5g of Salted Butter
Salt and Pepper

Vegetables
800g Brussels Sprouts
450g Mushrooms
2 Tbsp Porcini Mushroom Powder
Salt and Pepper
Olive Oil


Directions

1. Prepare a marinade of the juice and fine zest of 3 lemons, 1 chopped onion, 1 tbsp granulated garlic, 1 tbsp dried thyme and enough chicken stock to cover. Butterfly, then marinate chicken breasts for 8 hours, any longer and the chicken breasts will start to cure too much in the acid.

2. Heat a large non-stick frypan or grillpan over moderately high heat for several minutes then add chicken breasts and grill on each side until browned, turn and flipping occasionally to promote more even cooking. Remove meat from pan once an internal temperature of 160F has been reached. Remove to plate and allow juices to collect. Notes: Do not force meat off grill as this will likely causing tearing, if sticking, wait. Brush raw side when turned up with olive oil before first flip.

3. In a small saucepan, reduce the juice and zest of two lemons, 250ml chicken stock, and garlic to a syrup. Add 50ml chicken stock, pan juices from resting chicken, add butter in small chunks and whisk till smooth. Season to taste.

4. In a pressure cooker, add the Brussels sprouts and about 300ml of water. Cook under pressure for 12 minutes.

5. In an 11" french skillet, add mushrooms and cook, covered, over low heat until mushrooms are soft and their juices have rendered. Sprinkle with porcini mushroom powder, salt, white pepper, and a splash of olive oil.

6. Quarter and peel an avocado, slice medium thin and fan out on serving plate.

Crispy Trout With Shallot White Wine Cream and Grapes and Lemon


So, about a month ago, I started taking weekend classes at George Brown College and this past week we were supposed to make trout poached in fish stock with grapes and shallots then turn the poaching liquid into a cream sauce. I tasted the demo dish and didn't really like it very much and almost wanted to leave the class early and not cook, and then I decided to make the dish my own. I'm glad I did. My girl loved what I made. And I thought it was delicious too.

Ingredients


1 Side of Trout Cut into 3 equal pieces (Bones and skin removed)
1 Lemon (Julienne Zest and Juice Reserved)
1 Handful of Seedless Green Grapes (Crushed)
3 Shallots (Finely diced)
60g Butter
20g Bread Flour
200ml Cream
200ml White Wine
250ml Fish Stock
1 Handful of Parsley (Chopped)
2 Tsp of Dried Tarragon
Salt, White Pepper
Olive Oil

1. Peel the lemon and julienne the peel. Crush the grapes and combine with the lemon peel. Squeeze half the lemon into the peel and grape garnish. Chill.

2. Prepare a mixture of the flour and 30g of the butter in a small bowl until a paste is formed, form into small pieces and reserve. Over medium high heat, in a small saute pan, add 30g of butter and the shallots, saute until softened. Add white wine and reduce for 2 minutes. Reduce to medium low, add cream, stir until combined. Increase to medium heat, add butter and flour paste in tsp amounts, stir until combined. Add until sauce has thickened enough that a line drawn on your stirring spoon stay separated but the sauce still runs off the spoon, if too thick, add more fish stock a tbsp at a time. Reduce heat to low then season to taste with salt and white pepper.

3. In a frypan over medium high heat, add olive oil and heat until rippling, add salmon fillets and fry for 2 minutes per side then break into small pieces and continue frying until crispy.

4. To serve, add sauce to warm plate, place fish in centre on sauce in neat conish pile, garnish with grape and lemon peel mixture, parsley, lemon juice, and dried tarragon.

Sunday, May 27, 2012

Chocolate Croissants "Pate levee Feuiette"


So, I made these yesterday in my boiling hot kitchen (terrible for pastry, doubly bad for this one) and used a bad recipe, but they still worked out ok. See below, for what seems to be a really good recipe video, and one that I'm going to use next time around.

April

It's been a little while since anything has been posted as my sister was in town and I was doing stuff with her. The two of us made a fairly solid dinner for my parents, aunt, uncle, and of course, my girl. I don't have any photos but we had five courses of which my mother insisted I print a menu card for and make a copy for each person... uncomfortable... if I make anything from that meal again, I'll write up recipes and provide photos.

I was at the St. Lawrence Market yesterday and I got a whole piece of Peameal Bacon, and since I had a couple of buttermilk biscuits left over from the last batch in the freezer and a bunch of eggs and butter, eggs benedict happened again at her request. No need to repeat anything here from the previous post, but take a look here if you're interested. The only interested thing of note is when I prepared the Peameal bacon, I dry fried it with no other fat or liquid and after it had cooked on each side, I poured water into the pan to get the fond back onto the meat as a glaze and to add a feeling of moistness back into the meat as well without compromising the crispiness. I like to do the same thing when cooking chinese dumplings, but more on that another time.


Poached Eggs

So, having made three fairly perfect poached eggs this morning, two being for me, one being for David Bowie Papillion, I've realized that there is a great deal in the freshness of an egg as it relates to poaching. There's no real mystery to it, the fresher the egg, the better it will become a nice round globe. You don't have to swirl the water, you don't have to drop the eggs in at a certain speed, you don't have to fuss too much about the temperature of the water, or the ratio or type of vinegar used. You just need fresh eggs and water heated over medium heat. If you do have a thermometer, the water should be heated to around 82 degrees celcius, and if you do decide to add vinegar, any will do, any it's probably something like 30ml for every 1L of water. Also, if you crack your egg into a small bowl, or something before pouring it into the water, it's much easier. But that's it, use fresh eggs to make great poached eggs.


BEARTATO LASAGNA!!!! 50TH POST!!!!

BEARTATO!


BEARTATO LASAGNA!!!!


So, Beartato Lasagna. So, I've never eaten bear, never cooked with bear, never seen someone eat some bear, and now, I've cooked bear meat, and eaten it too. And, after all the things I've heard to the contrary, it was actually quite delicious. The meat I happened to get was from a town a few hours north of where I live from a co-worker who got it from a friend who got it from a bear that was apparently shot by a child. True story, or so I was told. As to why, I made Beartato Lasagna, literally, with real bear, and of course, real potatoes, I don't know, it just made sense. It feels wrong to me to even consider making a Beartato Lasagna  without using real bear, and so, I don't know if there is really a better use for bear meat. I'm going to have to freeze this bear until a friend of mine can come over for dinner and share it with my girl and I. Good thing I had more than enough bear meat to make a full size bear and potato lasagna as well for eating purposes in the near or immediate future.